From the dashboard:
-
Locate the sidebar menu on the left side of the screen.
-
Click on the “Info System” section to expand the menu options.
-
Select “Universities” from the list. This will take you to the Universities page, where you can view the list of existing universities.
Adding a New University
To add a new university:
-
Click on the “Add University” button located at the top right corner of the universities list. This will open the “Add University” form.

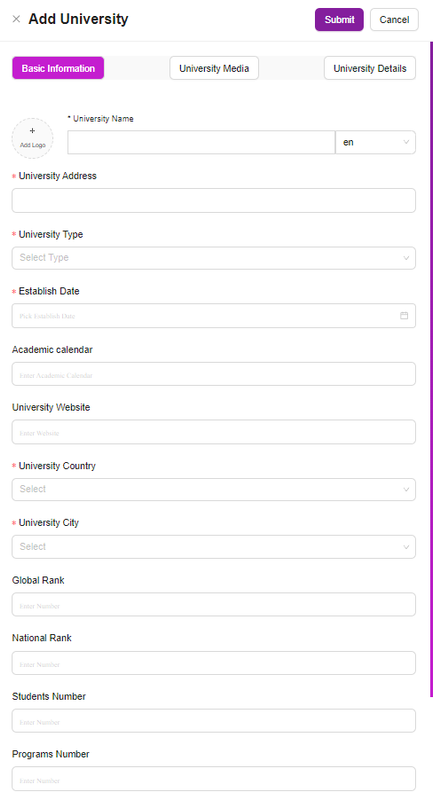
Filling in the Basic Information
-
University Name (Required): Enter the name of the university.
-
University Address: Provide the full address of the university.
-
University Type (Required): Select the type of university from the dropdown menu (e.g., public, private).
-
Establish Date: Choose the establishment date of the university using the date picker.
-
Academic Calendar: Enter the academic calendar details.
-
University Website: Provide the official website URL of the university.
-
University Country (Required): Select the country where the university is located.
-
University City (Required): Enter the city where the university is situated.
-
Global Rank: Enter the global ranking of the university.
-
National Rank: Enter the national ranking of the university.
-
Students Number: Provide the number of students enrolled.
-
Programs Number: Enter the number of programs offered by the university.
-
Average Price: Provide the average tuition fee.
-
Sale Percent: Enter the percentage of any ongoing sale or discount.
Uploading University Media
-
Click on the “University Media” tab.
-
You can Add “Video” and “Background Image”, other Media Files
-
Add Logo: Click on the “+” button to upload the university’s logo. Ensure the logo is in an appropriate format and resolution.
Entering University Details
-
Click on the “University Details” tab.
-
Detailed Description: Provide a comprehensive description of the university, including history, University Information, and other relevant information.
-
Additional Information: Enter any additional information that might be useful for the users.
Submitting the Form
-
Review all the information you have entered to ensure its accuracy.
-
Click the “Submit” button located at the top right corner of the form.
-
Once submitted, you should receive a confirmation message indicating that the university has been successfully added to the system.
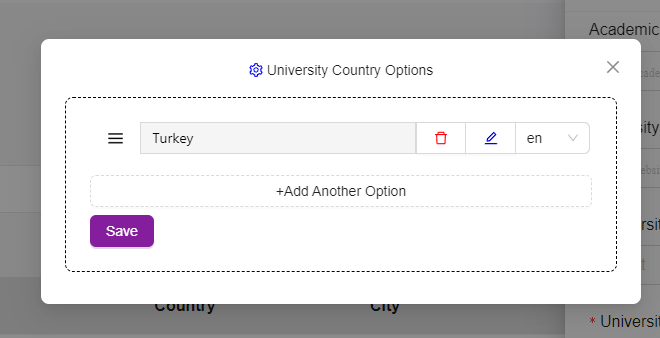
Note: You have to add “City” and “Country” To add a new “City” or “Country”
-
Open the “Add University” form.
-
Go to University Country and click on the settings icon
-
Click on add another Option
-
Add another option and click save
-
Edit Existing Options:
-
To edit an existing option, click the pencil icon next to the option you want to modify. Make your changes and click the save icon to confirm.
-
-
Delete an Option:
-
To delete an option, click the trash bin icon next to the option you want to remove. Confirm the deletion if prompted.
-
To add a “City” do the same steps